


Wooden cat toys are not only durable but also provide a natural and stimulating experience for our feline friends. However, like any other toy, they can get damaged over time due to the enthusiastic scratching, biting, and playing of our cats. As a wooden cat toy supplier, I understand the importance of maintaining these toys to ensure they last longer and continue to provide entertainment for your beloved pets. In this blog post, I'll share some practical tips on how to repair a damaged wooden cat toy.
Assessing the Damage
The first step in repairing a wooden cat toy is to assess the extent of the damage. There are different types of damage that wooden cat toys can suffer, and each requires a different approach to repair.
- Scratches and Minor Dents: These are the most common types of damage. Cats love to scratch, and over time, their claws can leave visible marks on the wooden surface. Minor dents can also occur if the toy is dropped or knocked around. For scratches and minor dents, a simple sanding and refinishing can often do the trick.
- Loose Parts: Some wooden cat toys come with additional parts such as bells, feathers, or catnip pockets. These parts can become loose or detached over time. In such cases, you'll need to reattach or replace the loose parts.
- Cracks or Splits: More severe damage includes cracks or splits in the wood. This can be caused by excessive force or repeated stress on the toy. Repairing cracks and splits may require more advanced techniques and materials.
Repairing Scratches and Minor Dents
For scratches and minor dents, you'll need a few basic tools and materials:
- Sandpaper (medium and fine grit)
- Wood stain or paint (matching the color of the toy)
- Paintbrush
- Mineral spirits or wood cleaner
Here's how to repair scratches and minor dents:
- Clean the Surface: Use a wood cleaner or mineral spirits to clean the damaged area. This will remove any dirt, debris, or cat hair that may be stuck to the surface.
- Sand the Damaged Area: Start with medium-grit sandpaper to smooth out the scratches and dents. Sand in the direction of the wood grain to avoid creating more damage. Once the surface is smooth, switch to fine-grit sandpaper to give it a polished finish.
- Apply Wood Stain or Paint: If the scratch or dent has removed the finish from the wood, you'll need to apply a matching wood stain or paint. Use a paintbrush to apply the stain or paint evenly over the damaged area. Let it dry completely according to the manufacturer's instructions.
- Seal the Surface: To protect the repaired area and give it a long-lasting finish, apply a clear sealant. This will also help to prevent future scratches and damage.
Reattaching Loose Parts
If your wooden cat toy has loose parts, you'll need the following tools and materials:

- Glue (wood glue or a strong adhesive suitable for the material of the part)
- Small screws or nails (if applicable)
- Pliers or a screwdriver
Here's how to reattach loose parts:
- Clean the Surfaces: Clean the surfaces of the loose part and the toy where it will be reattached. This will ensure a strong bond.
- Apply Glue: Apply a small amount of glue to the surfaces that will be joined. Press the part firmly into place and hold it for a few minutes to allow the glue to set.
- Use Screws or Nails (if necessary): For parts that require more secure attachment, you can use small screws or nails. Use a screwdriver or pliers to insert the screws or nails carefully. Make sure not to damage the wood.
Repairing Cracks or Splits
Repairing cracks or splits in a wooden cat toy is a more advanced repair job. You'll need the following tools and materials:
- Wood filler or epoxy resin
- Sandpaper (medium and fine grit)
- Clamps
- Wood stain or paint (matching the color of the toy)
- Paintbrush
Here's how to repair cracks or splits:
- Clean the Crack or Split: Use a wood cleaner or mineral spirits to clean the crack or split. Remove any dirt, debris, or loose wood particles.
- Apply Wood Filler or Epoxy Resin: Fill the crack or split with wood filler or epoxy resin. Make sure to fill it completely and level the surface. Use a putty knife to smooth out the filler or resin.
- Clamp the Crack or Split: If the crack or split is large, you may need to use clamps to hold the wood together while the filler or resin dries. Follow the manufacturer's instructions for the drying time.
- Sand the Repaired Area: Once the filler or resin is dry, sand the repaired area with medium-grit sandpaper to smooth it out. Then, switch to fine-grit sandpaper for a polished finish.
- Apply Wood Stain or Paint: Apply a matching wood stain or paint to the repaired area to blend it in with the rest of the toy. Let it dry completely.
Preventing Future Damage
To keep your wooden cat toys in good condition and prevent future damage, here are some tips:
- Choose High-Quality Toys: Invest in high-quality wooden cat toys that are made from durable materials. Look for toys that are well-constructed and have no loose parts or weak spots.
- Rotate Toys Regularly: Rotate your cat's toys regularly to prevent them from getting bored and overusing one toy. This will also help to extend the lifespan of the toys.
- Provide a Scratching Post: To protect your wooden cat toys from excessive scratching, provide your cat with a scratching post. This will give them an appropriate place to scratch and satisfy their natural instincts.
Where to Find Quality Wooden Cat Toys
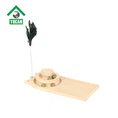
As a wooden cat toy supplier, I offer a wide range of high-quality wooden cat toys, including the Wooden Cat Scratching Board Toy, Wooden Cat Scratch Post Toy, and Wooden Catnip Toy. Our toys are made from natural, non-toxic wood and are designed to provide hours of entertainment for your cats.
If you're interested in purchasing our wooden cat toys or have any questions about repair and maintenance, please don't hesitate to contact us for procurement discussions. We're always happy to help you find the perfect toys for your furry friends.
References
- "Woodworking for Beginners: A Step-by-Step Guide" by John Smith
- "Caring for Your Cat's Toys" by Cat Care Magazine